Lawnmowers are very important to house owners that have a yard of grass around their house. But just like any other piece of man-made machinery, it can go faulty at any given time, especially if it has not been in use for a long time. One of the parts that’s notorious for causing failure to the lawnmower is its carburetor. And that’s why owner of lawnmowers often ask how to clean lawn mower carburetor. You know that once you can get it over with, your problem is already half solved.

The easiest way to clean your lawn mower carburetor is to first isolate it from the whole lawnmower unit, dismantle its parts and then spray a carburetor cleaner thoroughly on each of part of the carburetor. For cleaning a carburetor, the carburetor cleaner is essential. Other tools needed are a screwdriver, spanner, sand paper and maybe a blue gum for the gasket (we’ll talk about this much later).
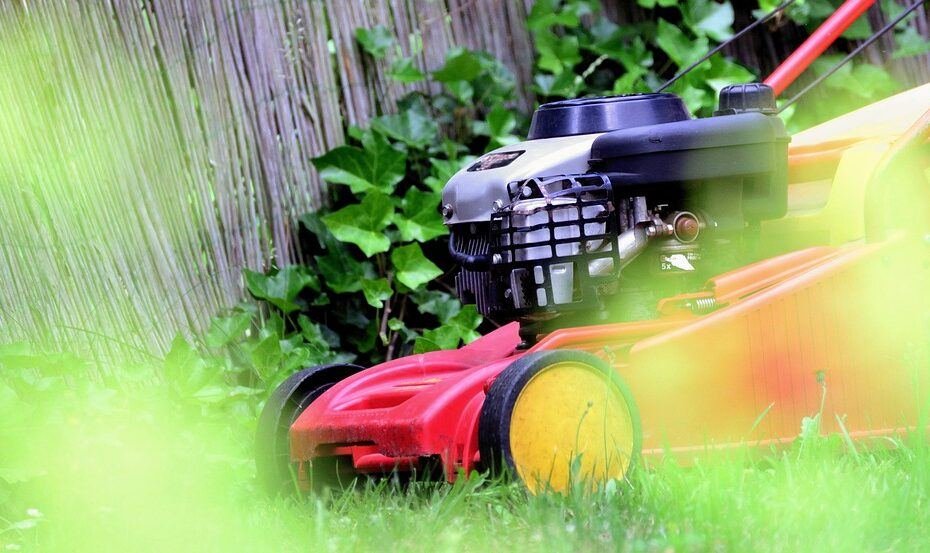
Generally speaking, a carburetor is a device that mixes the air and fuel to proportional ratio in the combustion chamber of an engine, which is required for it to start up. In context, or for the sake of this post, we will be looking at carburetors only for lawnmowers and how to clean them.
Please note that while speaking about lawnmower carburetors, people who have electric, battery powered and robotic lawn mowers can’t relate. That’s because carburetors can only be found in gas/fuel powered lawnmowers.
It is important to clean the carburetor of your lawnmower because upon usage, dirt, debris and grass might clog the carburetor and fuel line thereby making it difficult to supply the fuel necessary for combustion.
That’s why cleaning a carburetor is seen as preventive maintenance. So find below are the ways to clean your lawnmower carburetor.
In as much as some people would not like to work on an engine, cleaning a lawn mower carburetor is fast and easy. It can save you the stress of hiring a technician and paying him or her. The steps used in this post has DIY approach.

DIY APPROACH TO CLEANING LAWNMOWER CARBURETTOR
Once it is time for your scheduled maintenance on your lawn mower, make sure you include your carburetor in the agenda of parts to clean.
In fact, do not wait for scheduled maintenance especially if you have noticed something doesn’t feel or sound right with the lawn mower.
So for cleaning the carburetor, find below are the steps to take to make sure your carburetor is clean and your lawn mower is up and running again.
STEP I
It is highly important that we observe all forms of safety while working on engine parts. When working on a carburetor, there will still be some fuel left in it. This fuel can sometimes be noxious, and this is why you must work in a well ventilated area once engine parts are involved.
However, if you are mandated to work on the carburetor in a garage, make sure that the doors and windows are fully opened. For even more ventilation, we recommend that you install a fan.
Finally, on safety, make sure there’s no fire or glowing splint in and around where you are working. Gas or petrol is highly inflammable, so that’s an accident we want to avoid.
STEP II
The next thing we want to do is to make sure that the problem we are facing is actually from the carburetor. We do not want to be too quick to jump into conclusions when the problem might be something else.
So before you even start using a screw driver or spanner on your lawn mower, make sure you have fuel in the tank, or that the spark plug is clean, screwed tight and making proper contact.
Also verify that the ignition switch is in the “ON” position. You might also want to check and see that the air filter of the lawn mower is clean.
If it is not, it will affect the air/fuel mixture in the combustion chamber (I will stop here as I don’t want to bore you with many details). All of these sound ridiculous, but trust me people often forget to check some of these basic things.
Even after checking all the above mentioned and you still have issues starting the lawnmower, do not be in a haste to overhaul.
Spray some carburetor cleaner into the carburetor compartment and try to crank the engine. Now if the lawnmower starts after this, then you really do need to clean the carburetor.
STEP III
So now that we have confirmed that the carburetor is the problem, we need to isolate it from the whole lawnmower unit. To do this, we will start by removing the outer casing of the mower.
It is fastened with screws or bolts. Once you remove the housing, the air filter becomes visible. Unscrew it and then you see the carburetor.
STEP IV
Once the carburetor becomes visible, you will also need to use your spanner to remove the bolt and nuts used to hold it in place. When you do this, carefully remove the fuel line.
This is your way of cutting off the fuel supply to the carburetor. And no matter how careful you are, some fuel will still spill out. So here’s pre informing you so you can prepare yourself with a piece of towel to mop up the fuel.
Now, if there’s no fuel spillage when you remove the fuel line, that could in itself be a different type of problem. It could mean that there is a blockage in the fuel line and that’s why fuel is not being supplied to the carburetor of the lawn mower. So in event of this, you can blow out any form of blockage in the line, so fuel can flow freely.
STEP V
So back to our carburetor issues. At this point, you must have successfully detached the carburetor from the whole unit. Now try to identify the carburetor bowl.
It is bolted into place with just one bolt. You can’t miss it. Use a carburetor cleaner to clean any grease or dirt around the bowl, after which you remove the bowl itself when you have unscrewed the bolt.
It is important to note that the nut actually has a hole which must be free from any type of dirt. Dirt clogging in this hole is one of the principal reasons why carburetors stop working.
So it is important that you clean it up. You can clean it up by using a paper clip or small wire. Just use it to poke the hole until is all cleaned up. Doing this can already starts solving your problems.
Another thing that can be an issue to this nut is the gasket. It can get stuck to the nut when it becomes old. So you will need to use a fine sand paper to scrape it off.
When this is done, apply the carburetor cleaner on the nut. If you notice that the carburetor bowl is damaged beyond repair, we recommend you buy a new one rather than try to repair it.
STEP VI
When you remove the nut, you should be able to remove the bowl as well. You will now notice a float that is attached with a pin to the carburetor.
Remove this particular pin. You will also notice a needle located at the small gasket inside the carburetor. So in this step, the idea is to locate the pin and needle, remove them and then replace them with new ones ever so carefully.
STEP VII
At this juncture, you should have had the carburetor all dismantled. Now is the time for a thorough cleaning. Use the carburetor cleaner to spray every inch of the carburetor. Do not forget to clean out any hole or orifice as dirt might get clogged up. As explained earlier, you can use a paper clip or piece of wire for this.
STEP VIII
As the carburetor is still in its dismantled position, it is good maintenance to replace the old gasket with an entirely new one. Make sure you do this. Some models will require you use blue gum to fasten the gasket between the carburetor and the bowl.
STEP IX
With all the separate units cleaned up, it’s time to reassemble. Put all the parts together and then attach it back to the engine.
Be careful to not miss out any part. Once you have set up the whole unit, make sure there’s fuel in the tank and then start the mower engine.
STEP X
If you have carefully followed all of these steps about how to clean your lawnmower carburetor and the lawnmower won’t still start, I think it’s time to refer to a more experienced fellow that is a technician.

WHEN TO CHECK LAWNMOWER CARBURETTOR
Well, depending on usage, as someone who uses the lawnmower more often will have more maintenance to do than someone who uses it less. We recommend that you check the carburetor at least once a quarter of every year. This will help to keep the fuel line clear and make the carburetor work in good conditions.
CLEANING LAWNMOWER CARBURETTOR WITHOUT REMOVING IT
Some people just do not like stress, and you cannot blame them. If there is an easier way of cleaning your lawnmower carburetor without necessarily removing it, then that’s an option to explore, right? Well, I present to you good news: It is really possible to clean your carburetor without removing it from the whole lawnmower unit.
Once you identify where the carburetor is on the lawnmower, spray the carburetor cleaner on the bowl and bowl nut. But for the rest of the components, you will be using an aerosol cleaner. This is because you are not doing an over haul, so you do not want to use the carburetor spray on the entire engine.
It is important to note that for a more thorough cleaning, we would recommend a total overhaul. However, if the lawnmower carburetor does not have so many issues, maybe you can just clean it without removing it.
HOW TO KNOW YOUR LAWNMOWER CARBURETTOR NEEDS CLEANING
By merely looking at your carburetor, it might be difficult for you to know if it needs cleaning or not. But there are some tell-tale signs that your carburetor will begin to show once it is time for you to clean it. Find below are some signs to show that your carburetor needs cleaning:
The Engine will not start
This is the first thing to indicate that the carburetor of your lawnmower needs proper cleaning. It could also mean that the fuel line has been clogged with dirt, hence blocking the passage of fuel to the carburetor for combustion to take place.
Smoking engine
This is the worst of all. Once you turn on the engine of the lawnmower, the exhaust starts to smoke. It means that there isn’t enough air being sent to the carburetor for the air/fuel mixture needed for combustion. So in this case, apart from the carburetor, you might want to check the air filter and make sure that it is clean. A smoking engine is as a result of incomplete combustion. Avoid this at all cost.
Pop sound
When you hear your lawnmower engine begin to make some pop or shooting sound from the exhaust, it means that fuel is not supplied enough to the carburetor.
So in dismantling the unit, check the fuel line connected to the carburetor and make sure that it is connected properly. But most importantly, check that dirt has not blocked the line. If it has, you will need to clean it up.
Increased fuel consumption
If you notice that your lawnmower has started consuming more fuel than before, then I think it’s time to check your carburetor. It could mean that there’s an excess supply of fuel into the carburetor and this is causing more harm than good. So once this is detected, you will need to overhaul your lawn mower unit and clean the carburetor thoroughly.
Hard starting
If you notice that your engine does not start as easily as it used to do before, then, you will need to make sure that both your fuel line and the carburetor have not been taken over by dirt.
Apart from gauging the oil level, having a dirty carburetor is one of the reasons your lawn mower engine is having difficulty starting. Once you notice it, the carburetor cleaner should be your best friend.
So those are some signs that you definitely need to clean your carburetor. The longer you hesitate, the worse it becomes.
USING A CARBURETTOR CLEANER
We have well-established that this is an important tool in cleaning out dirt, debris, and gunk from the carburetor. But applying this cleaner well will help to make the job more effective. So find below is how to use a carburetor cleaner for a lawnmower effectively:
- The first thing to do is to remove the air filter from the unit. When this is done, quickly clean up the dirt on top of the engine so that it doesn’t spread into the engine as the air filter has been removed.
- Now use the carburetor cleaner to spray off all the dirt, debris and grease around every nook and cranny of the carburetor, after which you can use a rag to clean up all the grease or debris splattered around the body of the carburetor.
- Reassemble the whole unit and start the engine of the lawnmower. While the engine is running, spray some cleaner around the outside of the carburetor. You will notice that the engine will pick up speed again. After a few minutes, turn of the lawnmower engine.
- With the engine shut down, spray the carburetor inside and outside. Very heavily this time. While doing this, turn on the engine and then spray some more cleaner on the carburetor.
- Finally, you could also spray some carburetor cleaner on the air filter of the lawn mower. But you must make sure you wipe it off with a dry rag. Install the rag again and you are good to go.
NOTE: In the absence of a carburetor cleaner, you should not be stranded. You can make use of a brake cleaner in the stead of a carburetor cleaner.
It is quite compatible on carburetors and dissolves dirt, grease and debris quite fast. And just like the carburetor cleaner, it consists of chemicals that dry up or evaporate quickly after application. So it leaves no residual dirt behind.
Conclusion
The carburetor of a gas or fuel powered engine is very important to the entire unit. If the carburetor fails to do its job, the engine will not work properly. The steps to clean the lawnmower carburetor and keep it in good working conditions have been spelt out. Stick to it and you will have no problems at all. Cheers!